Getting Started
Creating a New Project from a Template
A Storyist project contains your text files, story sheets, folders, and images.
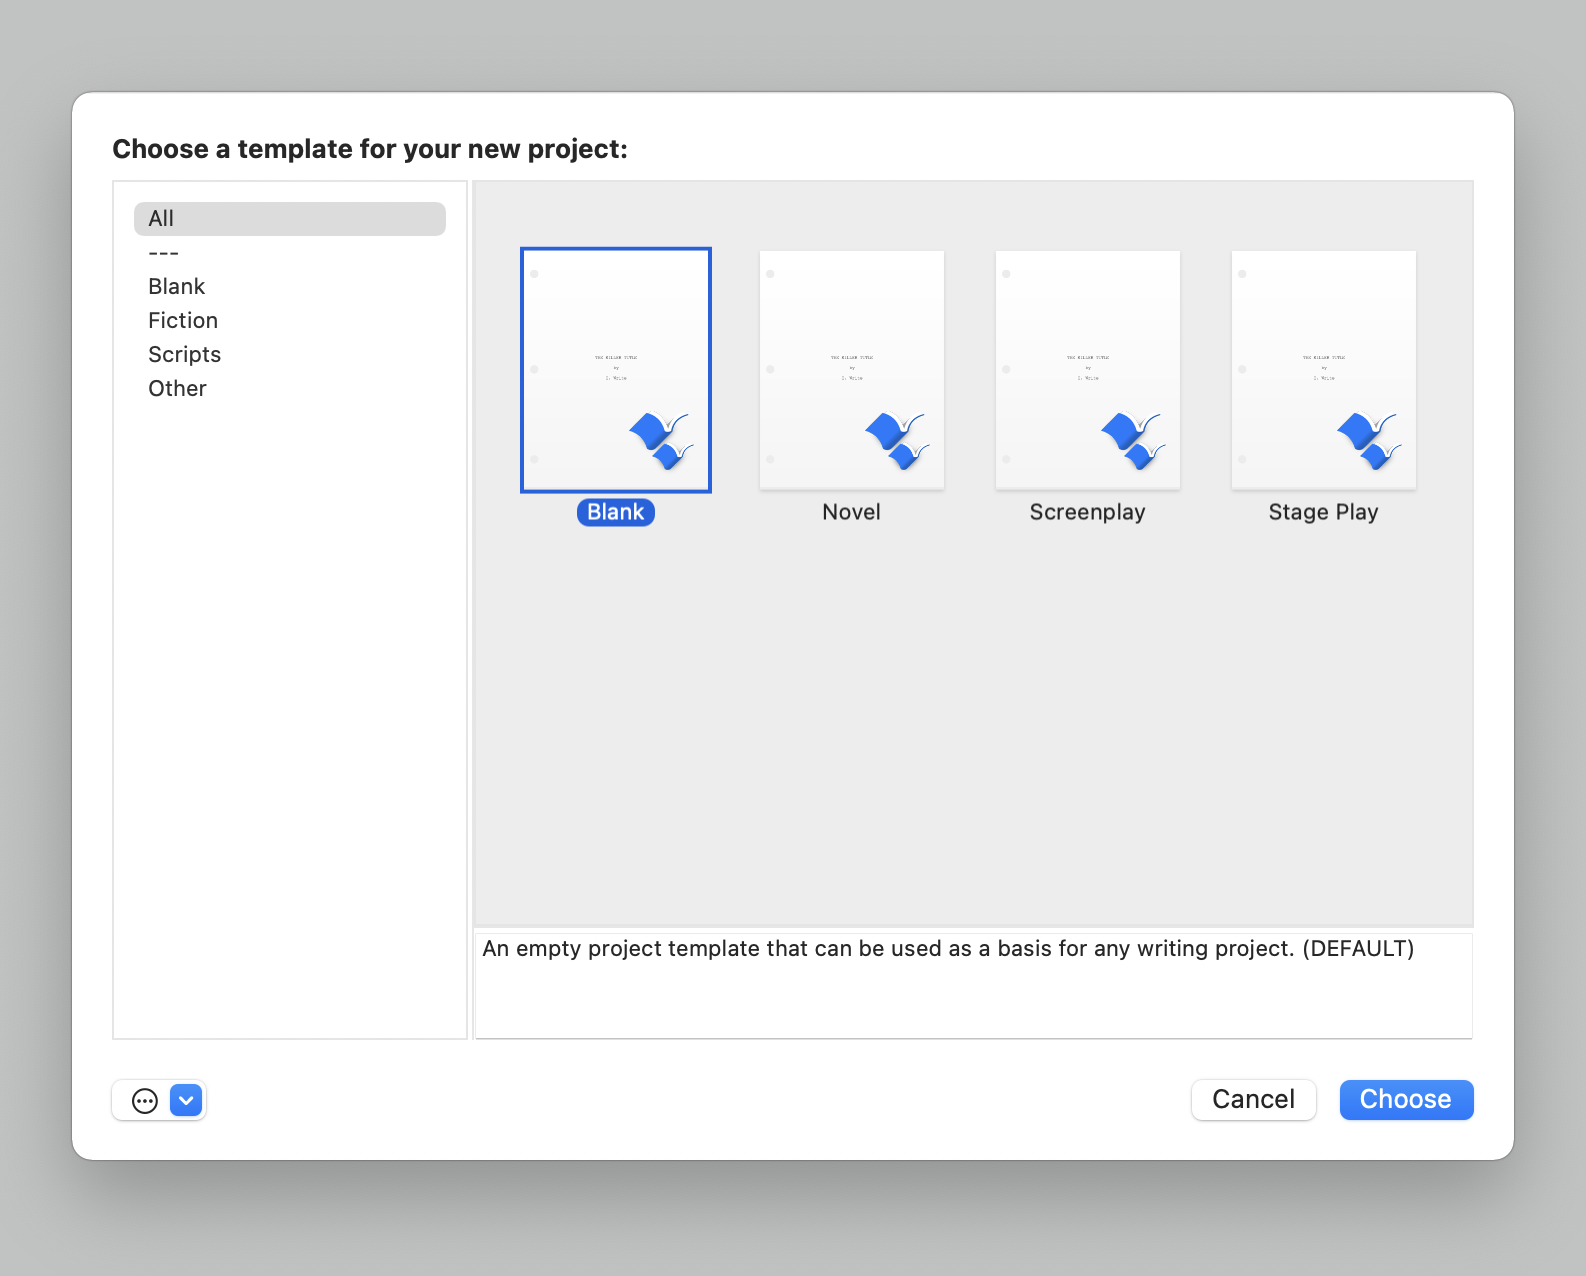
When you create a new project using the File > New Project command, the template chooser appears, allowing you to select a document template.
Project templates provide:
- Style sheets (formatting information)
- Placeholder manuscripts and story elements
- Introductory text for various project file types.
Storyist comes with several built-in templates that you can use as starting points for a new project: Novel, Screenplay, Stage Play, and Blank.
The Novel Template—This template provides a starting point for a novel manuscript and includes:
- A manuscript with style definitions that make it easy to format your novel in a standard format. The placeholder text includes a brief introduction to manuscript formatting to give you a sense of what the formatting looks like.
- A title page to include with your manuscript submissions.
- Several example character and setting sheets that you can use or replace as needed.
Choose this template if you want to write a novel and aren’t sure which template to use.
The Screenplay Template—This template provides a starting point for a feature-length screenplay and can be modified for playwriting. It includes:
- A script with style definitions that make it easy to format your screenplay in a standard format.
- A title page to include with your submissions.
Choose this template if you want to write a script or screenplay and aren’t sure which template to use.
The Stage Play Template—This template provides a starting point for a stage play. It includes:
- Style definitions that make it easy to format your stage play in a standard format.
- A brief introduction to stage play formatting to give you a sense of what the formatting looks like.
- A title page to include with your script submissions.
- Example front matter to include with your script submissions.
Blank—This template provides a starting point for a project of any type. It includes an empty folder to hold images. To add text files, story sheets, or additional folders to the project, click the Add button at the bottom of the Project view.
You might want to designate a particular template to be used every time you create a new document. To set a default template:
- Open the Preferences window by choosing Storyist > Preferences.
- Click the General preference pane if it is not already selected.
- Click the Choose button and click the template you want to set as the default.
Importing Existing Work
Storyist can import files written in other word processors if the files are stored in one of the following formats:
- Rich Text Format (.rtf)—Storyist imports text, formatting information, headers, footers, and style sheets. Use this format if possible.
- Rich Text with Attachments (.rtfd)—Storyist imports text, images, and formatting information.
- Microsoft Word (.doc)—Storyist imports text and formatting information.
- Microsoft Word (.docx)—Storyist imports text and formatting information.
- Open Document Text (.odt)—Storyist imports text and formatting information.
- HTML (.html)—Storyist imports text and formatting information.
- Text Only (.txt)—Storyist imports text information.
- Final Draft XML Format (.fdx)—This format is the default file format for Final Draft version 8 and later. Storyist imports script text, script notes, and screenplay element information.
- Scrivener Format (.scriv)—Storyist import text and formatting information, comments, index card summaries, style sheets, and project structure.
- Fountain Format (.fountain)—Fountain is a markup syntax for writing screenplays in plain text. Storyist imports formatted script text, comments, and index card information.
Note: While some word processors do not store their files natively in the above formats, most do allow you to export your file into them. Refer to the word processor’s manual for details.
To import a manuscript or script into a new project:
- Choose File > Open.
- Select a file in one of the formats listed above.
- Click OK.
To import a file into an existing project:
- Choose File > Import.
- Select a file in one of the formats listed above.
- Click the Import button.
Note: You can also import a file by dragging it to the Project view (on the left of the window) or to a folder in the Main view.
Getting Around
Your manuscript (or script) and notes are available from the Project view located at the left of the main window. To view a file or folder listed in the Project view, simply click it.
Much like a Web browser, Storyist remembers which pages you have viewed and in what order. You can navigate through them using any of these methods:
- Click the Forward or Back button in the Navigation bar in the Main view until you see the page you are looking for.
- Click the Navigation bar pop-up menu and select the page you are looking for.
- Choose View > Go Forward or View > Go Back until you see the page you are looking for.
Note: The Getting Started guide, available in the app, is a Storyist project that helps you get up-to-speed by walking you through some of the features you’ll use first. To view the Getting Started guide, show the Welcome window (Window > Welcome to Storyist) and click “Open the Getting Started guide.”